How to connect an outlet and a switch from one wire
The electrical wiring of any room, whether it be a huge country house or a small outbuilding (basement, garage, country house), includes three main elements - a switch, an outlet and a light bulb. While they remain relevant always and everywhere. During repairs, construction sites or redevelopments, you will surely come across them. Therefore, basic knowledge of electrical engineering will not be superfluous - what is the circuit for connecting a switch and a socket, how does it work, and what materials and tools will be required for its installation?
Below are detailed step-by-step instructions, with which the installation of sockets and switches with your own hands will be within the power of even a not too experienced electrician.
Content
What is needed to switch the circuit?
Electrical wiring is available in open and hidden design. In this article, we will consider the connection of sockets and switches, performed according to the second option, when all electrical connections are hidden under a layer of plaster. Concealed wiring is the most common type of wiring; open wiring is usually used as a temporary option.
Preparing the walls
Before connecting an outlet and a switch in the room, you need to prepare holes in the wall for their installation and grooves in which the wires will be laid. There should be three holes in total - for the junction box and for the connected switching devices.
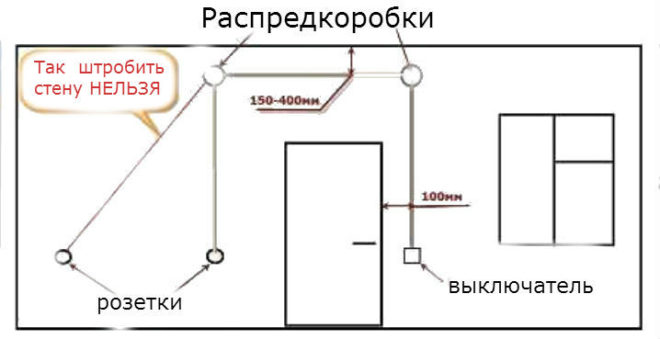
It is better to draw a rough drawing in advance on a piece of paper where exactly you plan to connect the switch and the outlet, and along what route the wires will be laid to these places.
The hole for the junction box is usually made under the ceiling, 10-15 cm lower. The holes for the switching devices are made at the place of their planned installation. It is better to mount the socket at a distance of 30 cm from the clean floor, where household appliances will be connected to it. It is advisable to install the switch at the entrance to the room at the level of the lowered hand of an adult - about 90 cm from the clean floor. These works are carried out with an electric drill with a special crown for brick or concrete, a hammer drill with a victorious drill, an impact drill or an angle grinder.
When installing a strobe, consider several important rules:
- They can only be horizontal or vertical, no slopes are allowed.
- The entire path of the groove from the junction box to the installation points of the outlet and switch should be carried out with a minimum number of turns.
- Vertical grooves should not be closer to window and door openings by less than 10 cm, and to gas pipes - by less than 40 cm.
You can use a hammer and a chisel, a hammer drill, a grinder, or a special tool with a chasing cutter to mount the strobes.
When all holes and grooves are ready, thoroughly clean them of dust with a vacuum cleaner.
Installation elements and tools

To perform the electrical part of the work, you will need the following materials and tools:
- junction (junction) box, in which all wires are connected;
- two plastic or polypropylene mounting boxes (socket boxes), they are needed in order to securely fix the switching devices in the wall holes;
- indoor socket;
- indoor switch with one button;
- lighting device;
- a set of screwdrivers (flat and cross-shaped);
- knife or stripper for stripping insulation from conductors;
- pliers with insulated handles;
- clamps or electrical tape;
- indicator screwdriver.
To connect the entire electrical circuit, you also need a two-wire wire. Now in electrical stores there is a huge assortment of wires and cables, so take one right away so that each core has its own colored insulation, for example, red and blue. This will facilitate the switching of the circuit, you do not have to search for the phase and zero with devices, you just need to connect the conductors of the same color.
In order to fix the wires laid in the grooves, you will need more alabaster and a spatula.
Connection diagram
The electrical circuit is a parallel connection to a power source of a lighting fixture with a light bulb, a switch and a socket.
Preparatory work
After turning off the machine, you must once again make sure that there is no voltage, now with an indicator screwdriver. First, check its operating condition in an area that is known to be energized, for example, at the entrance to the machine. The indicator lights up after touching the phase, which means it is in good condition. Now, touch the indicator screwdriver to the veins of the supply wire, which is brought into the apartment from the machine, there should be no glow. This means that the tension is removed and you can start work.
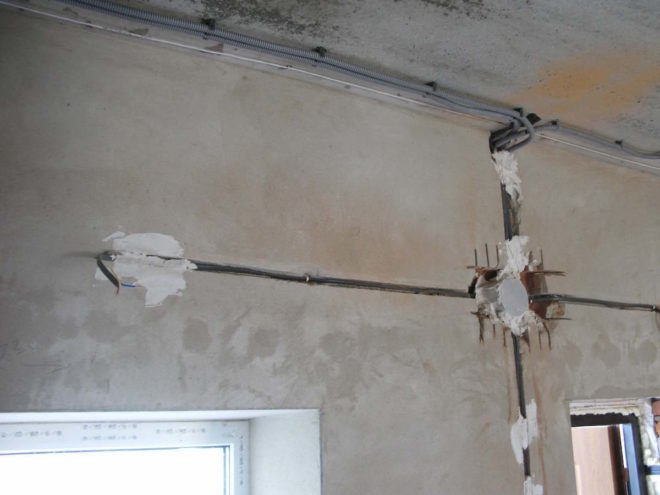
In the grooves made, lay the wires, leading them to the wall holes. At the same time, leave the ends of 10-15 cm for cutting the veins, do not regret it, it is better to make a slightly larger margin than it then suffers when connecting and connecting. Install a junction box and socket outlets in the holes; use plaster or alabaster to securely fix them.
Electric installation work
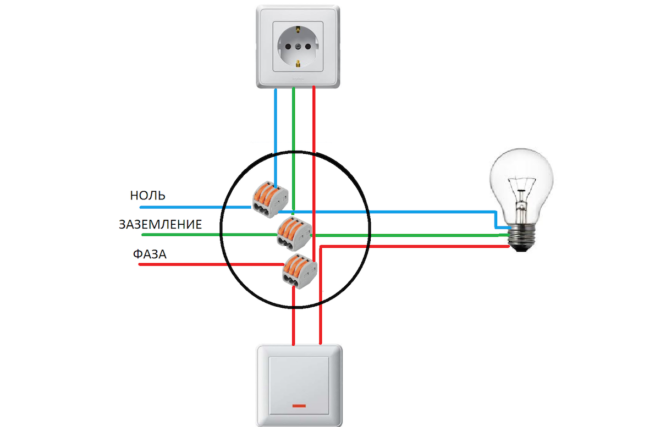
Insert a two-core cable from the mains supply (phase and zero) into the junction box. Three wires must be routed from the box: one to the switch, the second to the lamp, and the third to the outlet.
For a wire, the conductors of which have different colors of insulation, the red color indicates the phase, the blue color - zero.
The switch has an input and output contact, a phase conductor is connected to the input. Connect the second core to the output contact of the switch.
A two-wire wire must also be laid to the luminaire. The lamp holder has two contacts. The central spring contact (phase) serves to directly supply voltage to the light bulb. The side contact in the socket is zero, the lamp will come into contact with it after screwing in with its base.
Another two-core wire is laid from the junction box to the outlet. This switching device has a contact part consisting of two terminals, to which the phase and zero are connected.
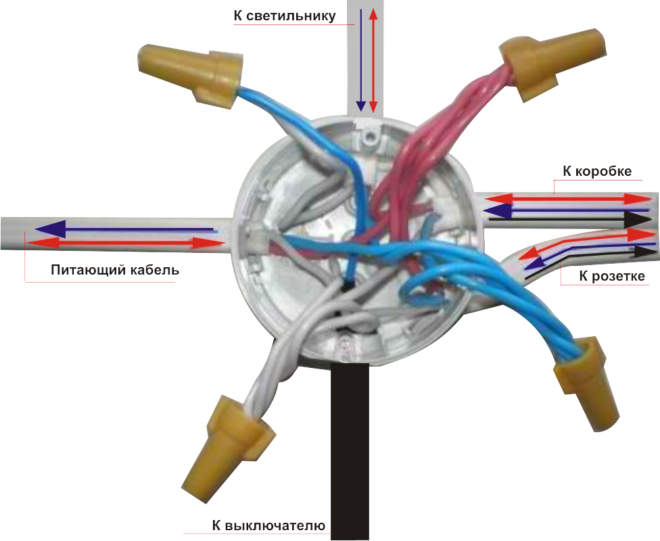
The connection diagram of the switch, lamp and socket in the junction box is as follows:
- Connect the zero core from the supply wire with the zero cores going to the lamp and the outlet.
- Connect the phase conductor from the supply wire to the phase conductors going to the switch and the outlet.
- Connect the remaining core from the output contact of the switch to the phase core of the luminaire.
All connections must be made as tight as possible in order to ensure reliable contact. This can be done in the old old-fashioned way - by twisting, which is still desirable to be soldered from above.There are also more modern devices: special pads (in which the wire is clamped under a screw) or PPE (connecting insulating clamps).
For more information on connecting wires in a junction box, see this video:
Checking the circuit and completing the work
Separate all twists in different directions so that they do not touch each other and check the work of the assembled circuit. Turn on the input circuit breaker to the apartment, thereby supplying voltage from the power source to the newly installed junction box. The switch is in the "off" position, the luminaire is off, which means everything is correct, the phase is open. Now press the switch key to the "on" position, the electrical circuit is closed and the voltage is supplied from the power source to the lamp through it, the light comes on. The voltage will be constantly present at the outlet; you can check its operation by connecting any electrical appliance. Insert the plug of the hair dryer, radio or electric kettle into the socket and check its operation.
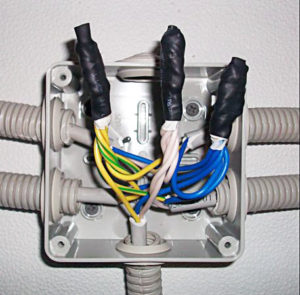 Now turn off the input machine again and reliably insulate the twist points with electrical tape, you can also put on PVC tubes on top. Carefully tuck all the connected wires in the box so that it is then closed with a lid.
It remains only to securely place the switch and the outlet in the socket boxes, fix it, put on the protective covers on top. The junction box is also closed with a lid, for any repair work, never hide it under wallpaper or plaster. Remember, the junction box should always be accessible, no matter how it spoils the overall look of your room.
Also keep in mind that if the lighting fixture and the socket are structurally protective earth, then a three-wire wire is needed for their electrical circuit. The same three-core wire should also come to the junction box from the power source. Usually the grounding conductor is indicated in green or yellow, in the same way in the box it will be necessary to connect three conductors of protective grounding in one twist - from a power source, a socket and a lamp.
Other scheme options
 Likewise, you can connect an outlet, a two-button switch and two groups of lighting fixtures from one power source. In this case, two wires from two output contacts of the switch and two phase conductors from the lamps will come to the junction box. The same as in the example described above, only there will be one more twist in the box.
If you need to install a three-button switch and three groups of lamps, respectively, three wires from the three output contacts of the switch and three phase conductors from lighting devices will come to the junction box. There will be 5 twists in the box:
- Zero of the supply network with zero conductors of the socket and lamp.
- The phase of the supply network with the phase conductors of the socket and switch.
- And three strands of phase wires extending from each switch button and group of lamps.
In the case of protective grounding, one more twist will be added. Sometimes it can be quite problematic to lay the twisted wires in the junction box. Now on the market for electrical goods, you can pick up options specifically designed to accommodate a large number of wires and cables.
This is how it is easy to connect a socket and a switch from one junction box. The main thing is to try to understand this very simple scheme.And then all further electrical circuits will be clear to you. As a result, you get a pretty decent cost savings on calling a professional electrician.


